04. Let's rotate and enlarge!
Overview
In this chapter, we rotate and enlarge particles. We also change the sprite shape from a square to a rectangle. This makes it possible to create complicated effects.
Rotation and expansion
We made it possible to download the effect created in advance from the link below.
Rotation
Let's rotate the particles immediately. Rotation can be specified from the "Rotation" window.
Click an icon of "Rotation" window to show "Rotation" window.
An icon of Rotation window
"Rotation" window
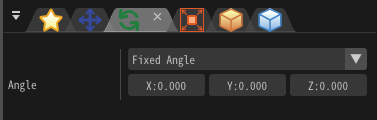
Just like the position, there are multiple ways to specify rotation.
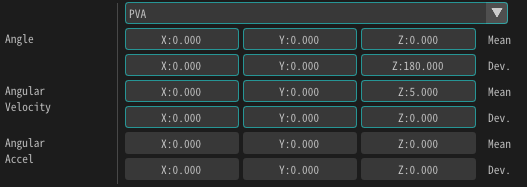
By default, Fixed angle is selected.
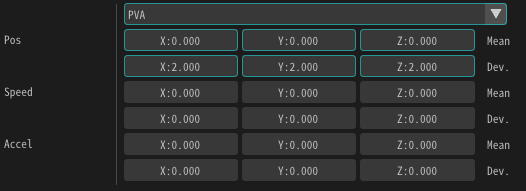
Change this to PVA.
Then enter 5 for Angular Velocity z.
This means that you rotate 5 degrees per frame about the Z direction (front direction) as the axis.
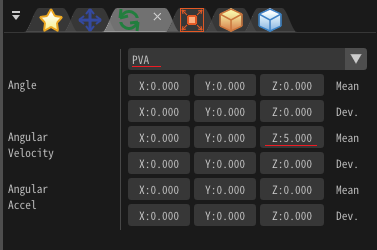
Angular velocity
After inputting, you play the effect ... nothing changes! This is because in the initial setting of drawing by sprite, the sprite always faces the front even if the particle rotates.
In the "Render Settings" window, change the Configuration from Billboard to Rotated Billboard.
Rotated Billboard is a layout method in which the rectangular shape faces the front while the Z axis rotation is enable.
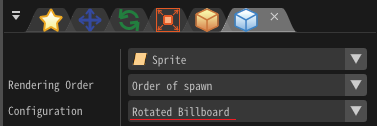
Configuration
When setting the Rotated Billboard, you can see that the rectangle rotates about the Z direction (front direction).

Rotation
Scale
As with position and rotation, you can scale particles. You can specify scale from the "Sale" window.
Click an icon of "Scale" window to show "Scale" window.
An icon of Scale window

"Scale" window
Just like the position and rotation, there is also a way to specify more than one in the scale.
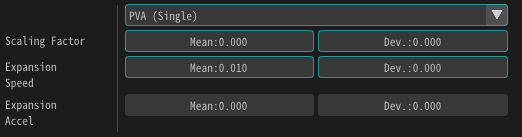
In the initial setting, the Fixed Scale is selected.
Change this to PVA(Single).
Then input 0.01 for Expansion Speed.
Expansion Speed can also be set individually in the X, Y, Z direction, but Expansion Speed is often the same for all directions.
Therefore, you can set a Expansion Speed.
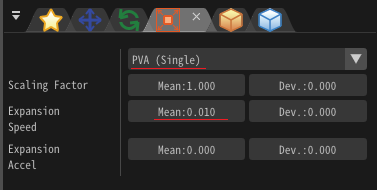
Expansion Speed
You can see that the sprite is rotating and enlarging.

Scale
Sprite shape
Sprite shape can be changed from square into rectangle, trapezoid, etc.
Change Vertex Coords from the "Render Settings" window, from Default to Fixed.
Then you can specify the coordinates of the vertices of the sprite.
For this time, let's input as follows to enlarge the sprite vertically.
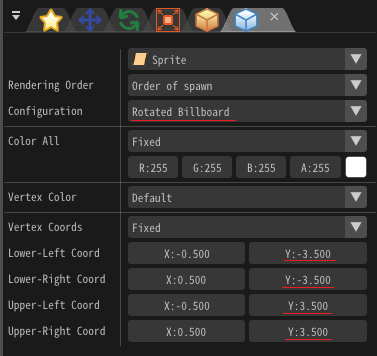
Vertex Coords
You can see that the vertical length of sprite is longer than horizontal length of one.

Vertex Coords
Finish
Since it is not good looking as it is, you change parameters as follows.
The "Basic Render Settings" window
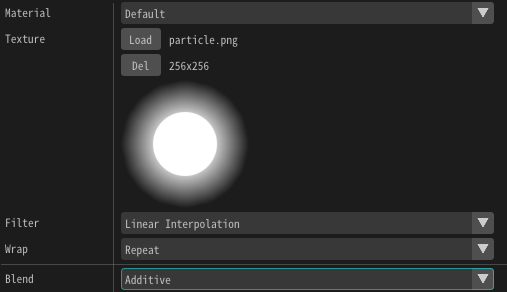
Select the Texture into particle.png
Change the Blend into Additive

Summary
In this chapter, we explained the sprite rotation and enlargement. In the next chapter, we will create practical effects by making the most of our knowledge.